
I’ve yet another factor to say on the relative sizing view modifier from my earlier put up, Working with percentages in SwiftUI structure. I’m assuming you’ve learn that article. The next is sweet to know if you wish to use the modifier in your personal code, however I hope you’ll additionally study some basic tidbits about SwiftUI’s structure algorithm for HStacks and VStacks.
Utilizing relative sizing inside a stack view
Let’s apply the relativeProposed modifier to one of many subviews of an HStack:
HStack(spacing: 10) {
    Coloration.blue
        .relativeProposed(width: 0.5)
    Coloration.inexperienced
    Coloration.yellow
}
.border(.major)
.body(top: 80)
What do you count on to occur right here? Will the blue view take up 50 % of the accessible width? The reply is not any. In reality, the blue rectangle turns into narrower than the others:

It’s because the HStack solely proposes a proportion of its accessible width to every of its youngsters. Right here, the stack proposes one third of the accessible area to its first little one, the relative sizing modifier. The modifier then halves this worth, leading to one sixth of the whole width (minus spacing) for the blue shade. The opposite two rectangles then grow to be wider than one third as a result of the primary little one view didn’t burn up its full proposed width.
Replace Might 1, 2024: SwiftUI’s built-in containerRelativeFrame modifier (launched after I wrote my modifier) doesn’t exhibit this conduct as a result of it makes use of the scale of the closest container view as its reference, and stack views don’t depend as containers on this context (which I discover considerably unintuitive, however that’s the way in which it’s).
Order issues
Now let’s transfer the modifier to the inexperienced shade within the center:
HStack(spacing: 10) {
    Coloration.blue
    Coloration.inexperienced
        .relativeProposed(width: 0.5)
    Coloration.yellow
}
Naively, I’d count on an equal outcome: the inexperienced rectangle ought to grow to be 100 pt large, and blue and yellow needs to be 250 pt every. However that’s not what occurs — the yellow view finally ends up being wider than the blue one:
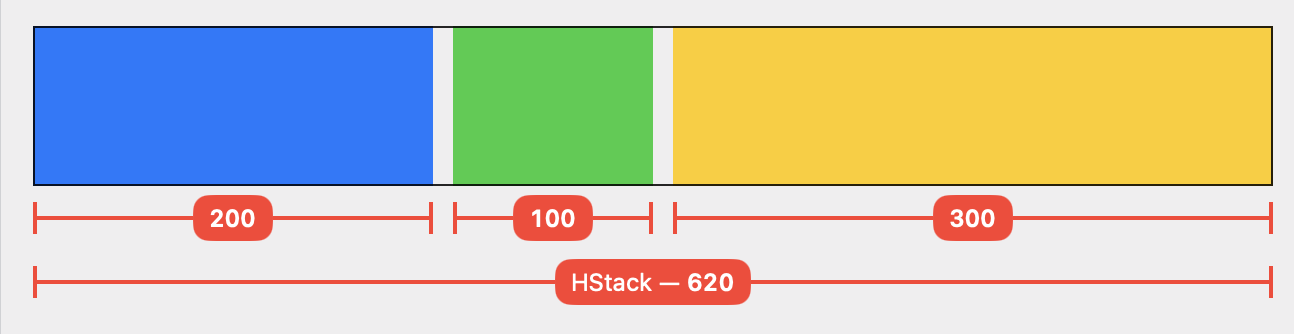
I discovered this unintuitive at first, however it is sensible should you perceive that the HStack processes its youngsters in sequence:
The HStack proposes one third of its accessible area to the blue view:
(620 – 20) / 3 = 200. The blue view accepts the proposal and turns into 200 pt large.Subsequent up is the
relativeProposedmodifier. The HStack divides the remaining area by the variety of remaining subviews and proposes that:400 / 2 = 200. Our modifier halves this proposal and proposes 100 pt to the inexperienced view, which accepts it. The modifier in flip adopts the scale of its little one and returns 100 pt to the HStack.For the reason that second subview used much less area than proposed, the HStack now has 300 pt left over to suggest to its ultimate little one, the yellow shade.
Vital: the order wherein the stack lays out its subviews occurs to be from left to proper on this instance, however that’s not at all times the case. Generally, HStacks and VStacks first group their subviews by structure precedence (extra on that under), after which order the views inside every group by flexibility such that the least versatile views are laid out first. For extra on this, see How an HStack Lays out Its Youngsters by Chris Eidhof. The views in our instance are all equally versatile (all of them can grow to be any width between 0 and infinity), so the stack processes them of their “pure” order.
Leftover area isn’t redistributed
By now it’s possible you’ll find a way guess how the structure seems once we transfer our view modifier to the final little one view:
HStack(spacing: 10) {
    Coloration.blue
    Coloration.inexperienced
    Coloration.yellow
        .relativeProposed(width: 0.5)
}
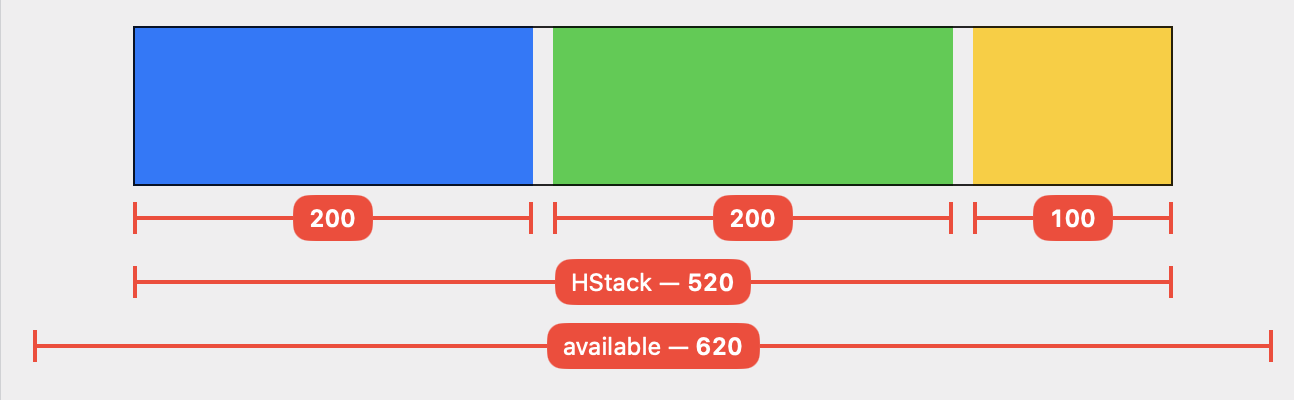
Blue and inexperienced every obtain one third of the accessible width and grow to be 200 pt large. No surprises there.
When the HStack reaches the
relativeProposedmodifier, it has 200 pt left to distribute. Once more, the modifier and the yellow rectangle solely use half of this quantity.
The top result’s that the HStack finally ends up with 100 pt left over. The method stops right here — the HStack does not begin over in an try and discover a “higher” answer. The stack makes itself simply large enough to comprise its subviews (= 520 pt incl. spacing) and experiences that measurement to its dad or mum.
Structure precedence
We will use the layoutPriority view modifier to affect how stacks and different containers lay out their youngsters. Let’s give the subview with the relative sizing modifier the next structure precedence (the default precedence is 0):
HStack(spacing: 10) {
    Coloration.blue
    Coloration.inexperienced
    Coloration.yellow
        .relativeProposed(width: 0.5)
        .layoutPriority(1)
}
This leads to a structure the place the yellow rectangle really takes up 50 % of the accessible area:
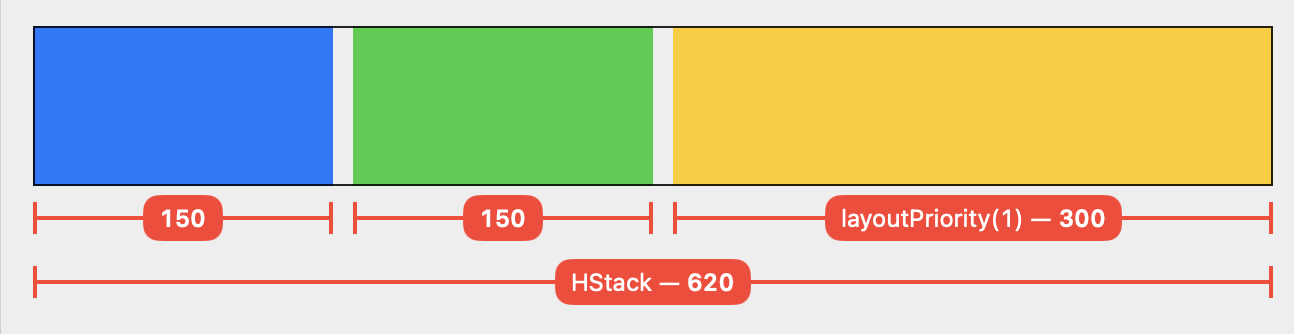
Rationalization:
The HStack teams its youngsters by structure precedence after which processes every group in sequence, from highest to lowest precedence. Every group is proposed the total remaining area.
The primary structure group solely incorporates a single view, our relative sizing modifier with the yellow shade. The HStack proposes your entire accessible area (minus spacing) = 600 pt. Our modifier halves the proposal, leading to 300 pt for the yellow view.
There are 300 pt left over for the second structure group. These are distributed equally among the many two youngsters as a result of every subview accepts the proposed measurement.
Conclusion
The code I used to generate the pictures on this article is obtainable on GitHub. I solely checked out HStacks right here, however VStacks work in precisely the identical manner for the vertical dimension.
SwiftUI’s structure algorithm at all times follows this primary sample of proposed sizes and responses. Every of the built-in “primitive” views (e.g. fastened and versatile frames, stacks, Textual content, Picture, Spacer, shapes, padding, background, overlay) has a well-defined (if not at all times well-documented) structure conduct that may be expressed as a operate (ProposedViewSize) -> CGSize. You’ll must study the conduct for view to work successfully with SwiftUI.
A concrete lesson I’m taking away from this evaluation: HStack and VStack don’t deal with structure as an optimization downside that tries to search out the optimum answer for a set of constraints (autolayout type). Somewhat, they kind their youngsters in a specific manner after which do a single proposal-and-response move over them. If there’s area leftover on the finish, or if the accessible area isn’t sufficient, then so be it.